16 years one-stop China custom CNC machining parts factory

Hey there I’m VMT Sam!
With 25 years of CNC machining experience we are committed to helping clients overcome 10000 complex part-processing challenges all to contribute to a better life through intelligent manufacturing. Contact us now
 2570 |
Published by VMT at Oct 12 2024
2570 |
Published by VMT at Oct 12 2024


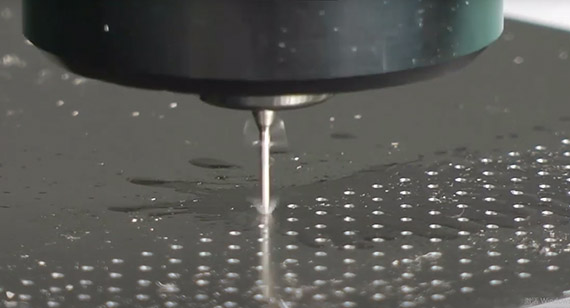
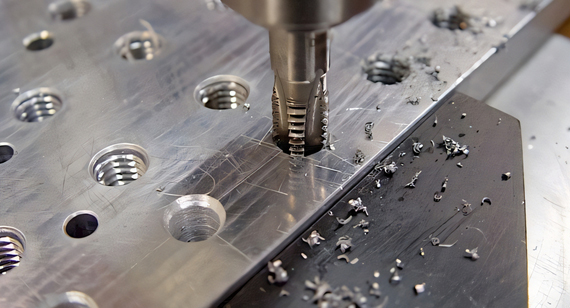
In CNC machining, precision is key, especially when creating specific features on machined parts such as countersinks. A countersink is a conical hole cut into a material, typically metal, to allow the head of a screw, bolt, or fastener to sit flush with or below the surface of the workpiece. Countersinks are used in a wide range of applications in industries such as automotive, aerospace, electronics, and more.
This article will provide a comprehensive guide to machining countersinks on metal workpieces, covering the steps, tools, materials, and techniques necessary to achieve professional results.
A countersink is a hole with a cone-shaped cavity at the top, designed to accommodate a screw head or fastener. The purpose of the countersink is to allow the head to sit flush with or below the surface of the material. Countersinking is a critical process in CNC machining services, ensuring that parts have a smooth, flat appearance without protruding fasteners.
Common countersink angles include 82°, 90°, and 120°, depending on the type of fastener being used. The choice of angle and size depends on the specific requirements of the part and application, whether it’s for custom CNC machining or high-volume production in a CNC machining shop.

Machining a precise countersink on a metal workpiece requires careful preparation, the right tools, and attention to detail. The following steps outline the process of creating a countersink:
1. Drilling a Pilot Hole
Before you begin countersinking, the first step is to drill a pilot hole. The pilot hole acts as a guide for the countersink drill bit, ensuring that the final countersink is centered and properly aligned. Choose a drill bit that matches the size of the screw or fastener shaft for accurate results.
2. Check and Make Sure the Countersink Angle Is Correct
Next, verify that the countersink angle matches the type of fastener being used. For example, 82° is commonly used for flathead screws, while 90° countersinks are more versatile and often used for general purposes. Confirming the correct angle ensures that the screw will sit flush with the surface.

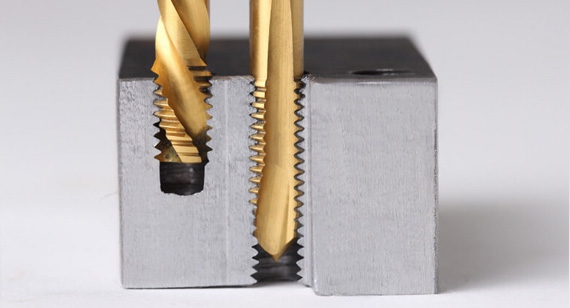
3. Select the Correct Countersink Drill Bit
Selecting the right countersink drill bit is essential for achieving the desired result. Countersink bits are available in various angles and sizes, so choose one that matches the size of the screw head and the material being drilled. High-speed steel (HSS), carbide, and cobalt are common materials for countersink bits, with carbide being ideal for hard metals.
4. Insert the Countersink Drill Bit into the Drill Chuck
Once you have the correct countersink bit, insert it into the drill chuck. Make sure it is securely fastened and properly aligned to prevent wobbling or inaccuracies during drilling.
5. Adjust the Drill Bit to the Proper Depth
Before drilling, adjust the depth of the drill bit to match the required depth of the countersink. Many CNC machines and drills allow for depth adjustment to ensure consistent, repeatable results.
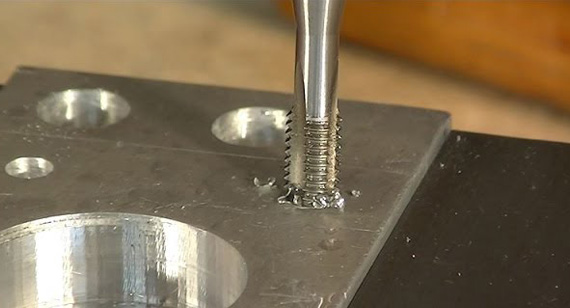
6. Drilling Countersink Holes
With the pilot hole drilled and the drill bit set to the correct depth, begin drilling the countersink. Apply steady, even pressure to avoid over-drilling, and take care to ensure that the bit doesn’t generate too much heat, which can damage both the tool and the workpiece.

7. Check the Countersink
Once the countersink has been drilled, check the hole to ensure that the screw head sits flush or just below the surface. Make any necessary adjustments to the depth or angle before moving on to the next hole.
Drilling the pilot hole is the first and most crucial step in countersinking. However, several common mistakes can occur during this process, affecting the final outcome.
Drilling Off-Center
One common issue is off-center drilling, where the pilot hole is not properly aligned. This can cause the countersink to be misaligned with the fastener, resulting in poor fit and finish.
Overheating the Drill Bit
Overheating the drill bit can dull the tool, reduce cutting efficiency, and damage the workpiece. To prevent this, use cutting oil or coolant to keep the bit cool and reduce friction.
Metal Burrs
Another frequent issue is the formation of metal burrs around the edges of the hole, which can interfere with the countersink process. These burrs should be removed with a deburring tool or file before continuing.
When drilling pilot holes or countersinks, a range of problems can arise. Understanding how to solve these issues will improve the quality of your work and ensure a smooth countersinking process.
Drilling Off the Mark
If the drill goes off the mark, realign the tool and re-drill the pilot hole. You may also want to use a center punch to create an indentation before drilling, which will help keep the drill bit centered.
Hole Too Shallow or Too Deep
If the hole is too shallow, adjust the drill depth and re-drill to the correct depth. If the hole is too deep, you may need to fill the excess space or restart the drilling process with more accurate measurements.
Rough Edges
Rough edges around the pilot hole can lead to issues with the countersink process. To avoid this, ensure that the drill bit is sharp and properly maintained, and use deburring tools to smooth out the edges before proceeding.
The material of the countersink drill bit is crucial in determining its performance and durability. The type of metal being countersunk will dictate which drill bit material is most suitable.

High-Speed Steel (HSS)
HSS countersink bits are commonly used for softer metals such as aluminum or brass. They offer durability and resistance to heat, but may wear out more quickly when used on harder materials.
Carbide
Carbide countersink bits are ideal for harder metals like stainless steel or titanium. They are highly resistant to wear and heat, making them a great choice for heavy-duty machining.
Cobalt
Cobalt drill bits are another option for countersinking hard metals. These bits offer excellent heat resistance and maintain their cutting edge for longer periods, especially when working on tough alloys.
Countersink Bits—The Pros and Cons
There are various types of countersink bits available, each with its own advantages and disadvantages. Understanding these options helps you choose the right tool for your specific needs.
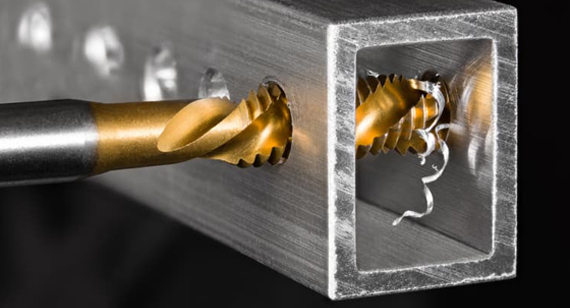
Flute Countersink Cutters
Flute countersink cutters have multiple cutting edges that spiral around the tool, providing smooth cutting action and efficient chip removal. They are ideal for general-purpose countersinking in soft to medium-hard metals.
Cross Hole Countersink Cutters
Cross hole countersink cutters feature a hole that runs through the cutting edge, which helps with chip evacuation. These bits are excellent for use in softer metals but may not perform as well in harder materials.
Zero Slot Countersink Cutters
Zero slot countersink cutters are designed for smooth finishes, as they don’t have visible flutes or slots. These tools are used when a polished surface finish is required, but they may struggle with chip clearance in harder materials.
The Right Countersink Bit for Your Metal
When selecting a countersink bit, always match the tool material and design to the type of metal being machined. For softer metals like aluminum, HSS or cobalt bits will suffice, while harder materials like steel or titanium require carbide bits for optimal performance.
Maintenance and Care of Countersink Tools
To extend the life of your countersink tools, proper maintenance is essential. This includes regular cleaning to remove metal debris, using lubricants to reduce friction, and sharpening bits as needed. Also, storing your tools in a clean, dry environment prevents rust and ensures they remain in optimal condition for future use.
Accurate marking and measuring are critical when preparing to drill a countersink hole. Precision at this stage ensures that the final result is aligned and functional.
How to Accurately Mark Metal for Drilling?
Use a center punch to mark the exact spot where the hole should be drilled. This creates a small indentation, ensuring the drill bit doesn’t wander off center when you begin drilling.
How to Measure Accurately: Tips and Tricks
When measuring the hole’s depth, use a caliper or depth gauge to ensure that the pilot hole and countersink are the correct dimensions. For high-precision jobs, double-check your measurements before drilling.
Countersinking: Smoothing and Finishing Techniques
After the countersink is completed, it’s important to ensure the edges and surfaces are smooth and free from burrs. This involves deburring and possibly sanding the area to eliminate roughness.
Best Practices for Cleaning and Polishing Metal Surfaces
Once countersinking is done, clean the workpiece using a non-abrasive cleaner to remove any metal shavings or debris. Polishing the area enhances the final appearance, and applying a protective coating prevents corrosion and extends the life of the part.
For Different Metals
Each metal has unique properties that affect the countersinking process. Below are tips for specific metals:
Aluminum
Use sharp HSS or carbide bits to avoid burr formation, and drill at slower speeds to prevent overheating.
Stainless Steel
Stainless steel requires carbide or cobalt bits due to its hardness. Apply cutting fluid to reduce heat and wear on the tool.
Brass
Brass is softer and more prone to burrs, so ensure sharp HSS bits are used and apply minimal pressure during drilling.
Beyond their practical uses, countersinks can also be employed creatively in metalwork. From decorative patterns to cable management, countersinks offer both functional and aesthetic benefits.
Expert Countersinking Tips for Complex Tasks
For more complex jobs, using guided countersinking bits can provide greater accuracy. Also, reducing heat buildup and experimenting with different drilling speeds can improve results when working with challenging materials.
Troubleshooting and Problem Solving
Common Challenges in Countersinking
Common issues include uneven edges, incorrect depth, and overheating. Solving these problems involves adjusting your tools and techniques for optimal performance.
Simple Solutions to Common Problems
Stabilizing the drill and maintaining consistent speed can prevent issues like chattering. If the angle is off, double-check your setup before continuing. Additionally, use cutting fluid to minimize overheating.
Maintenance and Tool Care
How to Care for Tools to Extend Their Life
Proper care involves cleaning tools after each use, lubricating them to prevent rust, and sharpening them regularly to maintain efficiency.
The correct countersink angle depends on the type of fastener or purpose. Common angles include:

60° (Deburring)
The primary purpose of this countersink angle is to remove burrs or sharp edges from the screw area of a metal part. After deburring, the metal has smoother edges.
75° (Rivet Heads)
The rivet head angle is ideal for most rivet head types, including drive, flush, friction-lock, Oscar, self-piercing, structural steel, and solid rivets.
82° and 90° (Countersunk Screw)
There are two angles for countersunk screws. However, the exact angle chosen is a function of the industry countersink screw standard. For instance, the US standard is 82°, while other countries and regions use 90° countersunk screws and the same angles.
120° (Countersinking Sheet Metal Rivets)
The type of rivets used for sheet metals are the thinner and blind Rivets, often requiring a countersinking angle of 120°. This angle requirement is due to their use in joining sheet metals.
Dimension Chart for 82° countersink angle in Inches
| Fastener Size (Thread) |
Pilot Hole Diameter (Close Fit) |
Pilot Hole Diameter (Normal Fit) |
Pilot Hole Diameter (Loose Fit) |
Countersink Diameter |
| #0 |
1/15 |
6/79 |
3/32 |
5/42 |
| #1 |
3/37 |
4/45 |
4/45 |
13/89 |
| #2 |
3/32 |
7/69 |
7/62 |
16/93 |
| #3 |
5/47 |
8/69 |
9/70 |
1/5 |
| #4 |
3/25 |
9/70 |
14/97 |
9/40 |
| #5 |
9/64 |
5/32 |
11/64 |
25/99 |
| #6 |
2/13 |
10/59 |
5/27 |
12/43 |
| #8 |
9/50 |
10/51 |
13/61 |
1/3 |
| #10 | 15/73 |
21/95 |
5/21 |
5/13 |
| #12 |
15/64 |
15/61 |
6/23 |
39/89 |
| 1/4 |
17/64 |
9/32 |
19/64 |
36/71 |
| 5/16 |
21/64 |
11/32 |
23/64 |
40/63 |
| 3/8 |
25/64 |
13/32 |
27/64 |
16/21 |
| 7/16 |
29/64 |
15/32 |
31/64 |
69/85 |
| 1/2 |
17/32 |
9/16 |
39/64 |
7/8 |
| 9/16 |
19/32 |
5/8 |
43/64 |
1 |
| 5/8 |
21/32 |
11/16 |
47/64 | 1 1/8 |
| 3/4 |
25/32 |
13/16 |
29/32 | 1 3/8 |
Dimension Chart for 90° Countersink Angle in Millimeters
| Fastener Size (Thread) |
Pilot Hole Diameter (Close Fit H12) |
Pilot Hole Diameter (Normal Fit H13) |
Pilot Hole Diameter (Loose Fit H14) |
Countersink Diameter |
| M3 |
3.2 |
3.4 |
3.6 |
6.94 |
| M3.5 |
3.7 |
3.9 |
4.2 |
8.96 |
|
M4 |
4.3 |
4.5 |
4.8 |
9.18 |
|
M5 |
5.3 |
5.5 |
5.8 |
11.47 |
|
M6 |
6.4 |
6.6 |
7 |
13.71 |
|
M8 |
8.4 |
9 |
10 |
18.25 |
|
M10 |
10.5 |
11 |
12 |
22.73 |
|
M12 |
13 |
13.5 |
14.5 |
27.21 |
|
M16 |
17 |
17.5 |
18.5 |
33.99 |
|
M20 |
21 |
22 |
24 |
40.71 |
Dimension Chart for 100° Countersink Angle in Inches
| Fastener Size (Thread) |
Pilot Hole Diameter (Close Fit) |
Pilot Hole Diameter (Normal Fit) |
Pilot Hole Diameter (Loose Fit) |
Countersink Diameter |
| #0 |
/ |
6/79 |
3/32 |
5/42 |
| #1 |
3/37 |
4/45 |
8/77 |
13/89 |
| #2 |
3/32 |
7/69 |
7/62 |
16/93 |
| #3 |
5/47 |
8/69 |
9/70 |
1/5 |
| #4 |
3/25 |
9/70 |
14/97 |
9/40 |
| #6 |
2/13 |
10/59 |
5/27 |
12/43 |
| #8 |
9/50 |
10/51 |
13/61 |
1/3 |
| #10 |
15/73 |
21/95 |
5/21 |
5/13 |
| 1/4 |
17/64 |
9/32 |
19/64 |
36/71 |
| 5/16 |
21/64 |
11/32 |
23/64 |
40/63 |
| 3/8 |
25/64 |
13/32 |
27/64 |
16/21 |
| 7/16 |
29/64 |
15/32 |
31/64 |
81/91 |
| 1/2 |
17/32 |
9/16 |
39/64 |
1 1/59 |
| 9/16 |
19/32 |
5/8 |
43/64 |
1 10/69 |
| 5/8 |
21/32 |
11/16 |
47/64 |
1 25/92 |
In CNC machining, countersinking is a fundamental process that ensures fasteners sit flush with the material surface. By following the steps and tips in this guide, you can achieve precise, professional countersinks in metal workpieces.
At VMT, we offer custom CNC machining services tailored to your specific needs, ensuring that all your countersinking requirements are met with precision and expertise.

What is the main difference between a countersunk and a countersunk hole?
A countersunk hole is designed to allow a screw head to sit flush with or below the surface, while a regular hole does not have the conical shape needed for this purpose.
What is the minimum metal thickness for a countersunk hole?
The minimum thickness depends on the size of the screw, but it is generally recommended that the material thickness is at least as great as the depth of the countersink.
How to drill a screw hole in metal?
Drill a pilot hole first, then use a countersink bit to create the conical shape required for the screw head.
What is the most commonly used countersink tool angle?
The 82° countersink angle is the most common, particularly for flathead screws.
How to countersink a hole without a countersink drill bit?
A standard drill bit can be used to create a countersink by carefully angling it, but this is not recommended for precision work.
What is the angle of the countersink?
Countersink angles vary but are typically 82°, 90°, or 120°.
How to determine the size of the countersunk hole?
The size of the countersunk hole depends on the diameter of the screw head and the required depth. A countersink chart can help determine the correct size.

 +86 15099911516


 Read more