15 years one-stop China custom CNC machining parts factory

Hey there I’m VMT Sam!
With 25 years of CNC machining experience we are committed to helping clients overcome 10000 complex part-processing challenges all to contribute to a better life through intelligent manufacturing. Contact us now
 316 |
Published by VMT at Nov 30 2022
The accuracy of CNC machining is the degree to which the three geometric parameters of the actual size, shape, and position of the machined part surface conform to the ideal geometric parameters required by the drawings. The ideal geometric parameters, in terms of size, are the average size; in terms of surface geometry, they are circles, cylinders, planes, cones, and straight lines; for the mutual position between surfaces, they are parallel and perpendicular , coaxial, symmetrical, etc. The deviation value between the actual geometric parameters of CNC machining parts and the ideal geometric parameters is called CNC machining error.
Related content of CNC machining accuracy
1、Dimensional accuracy
The degree of conformity between the actual size of the part after index control machining and the center of the tolerance zone of the part size.
2、Shape accuracy
The degree of conformity between the actual geometric shape of the surface of the machined part and the ideal geometric shape is controlled by the index.
3、position accuracy
The actual position accuracy difference between the relevant surfaces of the part after index control machining.
4、 Interrelationships
Usually, when designing CNC machining parts and specifying the machining accuracy of parts, attention should be paid to controlling the shape error within the position tolerance, and the position error should be smaller than the size tolerance. That is to say, for precision CNC machining parts or important surfaces of parts, the shape accuracy requirements should be higher than the position accuracy requirements, and the position accuracy requirements should be higher than the dimensional accuracy requirements.

The concept of CNC machining accuracy
CNC machining accuracy is mainly used to produce product level, and both CNC machining accuracy and CNC machining error are terms for evaluating the geometric parameters of the machining surface. The precision of CNC machining is measured by the tolerance grade, the smaller the grade value, the higher the precision; the error of CNC machining is expressed by a numerical value, the larger the numerical value, the greater the error. The high precision of CNC machining means that the error of CNC machining is small, and vice versa.
There are 20 tolerance grades from IT01, IT0, IT1, IT2, IT3 to IT18. Among them, IT01 means that the machining accuracy of the CNC parts is high, and IT18 means that the machining accuracy of the CNC parts is low. Generally speaking, IT7 and IT8 are The machining accuracy is medium level.
The actual parameters obtained by any CNC machining method will not necessarily be accurate. From the perspective of the function of the CNC parts, as long as the CNC machining error is within the tolerance range required by the part drawing, the CNC machining accuracy is considered to be guaranteed.
The quality of the machine depends on the processing quality of the CNC parts and the assembly quality of the machine. The processing quality of the CNC parts includes two parts: the processing accuracy and the surface quality of the CNC parts.
The accuracy of CNC machining refers to the degree to which the actual geometric parameters (size, shape and position) of the part after machining are consistent with the ideal geometric parameters. The difference between them is called CNC machining error. The size of the NC machining error reflects the level of NC machining accuracy. The larger the error, the lower the accuracy of CNC machining, and the smaller the error, the higher the precision of CNC machining.
1) Adjust the process system;
2) Reduce machine error;
3) Reduce the transmission error of the transmission chain;
4) Reduce tool wear;
5) Reduce the stress and deformation of the process system;
6) Reduce the thermal deformation of the process system;
7) Reduce residual stress.

Affected reasons
1) CNC machining principle error
The principle error of CNC machining refers to the error generated by using an approximate blade profile or an approximate transmission relationship for processing. The principle error of CNC machining mostly occurs in the machining of threads, gears, and complex curved surfaces.
In CNC machining, approximate machining is generally used to improve productivity and economy on the premise that the theoretical error can meet the precision requirements of CNC machining.
2) Machine tool error
Machine tool error refers to the manufacturing error, installation error and wear of the machine tool. It mainly includes the guiding error of the machine tool guide rail, the rotation error of the machine tool spindle, and the transmission error of the machine tool transmission chain.
3) Adjustment error
The adjustment error of the machine tool refers to the error caused by inaccurate adjustment.

Measurement method
CNC machining accuracy adopts different measurement methods according to different machining accuracy content and accuracy requirements. Generally speaking, there are the following types of methods:
1) According to whether the reading value of the measuring instrument directly represents the value of the measured size, it can be divided into absolute measurement and relative measurement.
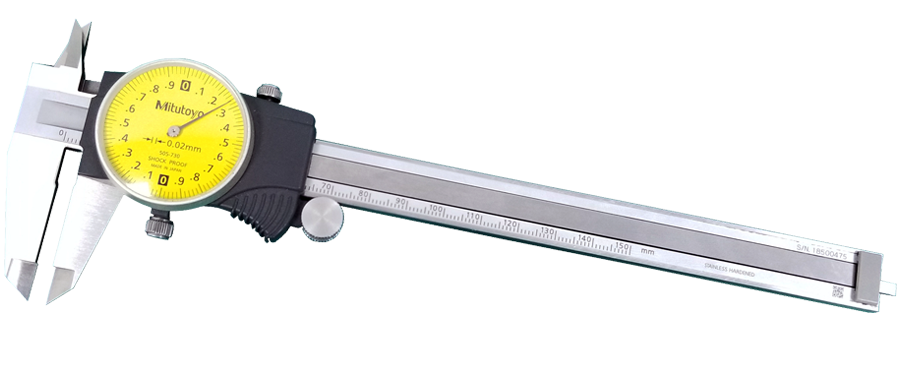
Absolute measurement: The reading value directly indicates the size of the measured dimension, such as measuring with a vernier caliper.
Relative measurement: The reading value only indicates the deviation of the measured dimension relative to the standard quantity. If you use a comparator to measure the diameter of the shaft, you need to adjust the zero position of the instrument with a gauge block first, and then measure. The measured value is the difference between the diameter of the side shaft and the size of the gauge block, which is relative measurement. Generally speaking, the accuracy of relative measurement is higher, but the measurement is more troublesome.
2) According to whether to directly measure the measured parameters, it can be divided into direct measurement and indirect measurement.
Direct measurement: directly measure the measured parameters to obtain the measured size. For example, measure with calipers and comparators.
Indirect measurement: measure the geometric parameters related to the measured size, and obtain the measured size through calculation.
Obviously, direct measurement is more intuitive, while indirect measurement is more cumbersome. Generally, when the measured size cannot meet the accuracy requirements by direct measurement, indirect measurement has to be used.
3) According to whether the measured surface is in contact with the measuring head of the measuring tool, it can be divided into contact measurement and non-contact measurement.
Contact measurement: The measuring head is in contact with the surface to be contacted, and there is a mechanically acting measuring force. Such as measuring parts with a micrometer.
Non-contact measurement: The measuring head is not in contact with the surface of the measured part, and non-contact measurement can avoid the influence of measurement force on the measurement results. Such as the use of projection method, light wave interferometry measurement and so on.
4) According to the role of measurement in the process of CNC machining, it can be divided into active measurement and passive measurement.
Active measurement: The parts are measured during the CNC machining process, and the results are directly used to control the machining process of the parts, so as to prevent the generation of waste products in time.
Passive measurement: measurement performed after machining of CNC parts. This kind of measurement can only judge whether the CNC machining parts are qualified, and is limited to discovering and rejecting waste products.
5) According to the number of measurement parameters, it can be divided into single measurement and comprehensive measurement.
Single item measurement: each parameter of the tested part is measured separately.
Comprehensive measurement: measure the comprehensive indicators that reflect the relevant parameters of CNC parts. For example, when measuring threads with a tool microscope, the actual pitch diameter of the thread, the half-angle error of the tooth form, and the cumulative error of the pitch can be measured respectively.
Comprehensive measurement is generally more efficient and more reliable for ensuring the interchangeability of parts. It is often used in the inspection of finished parts. Single-item measurement can determine the error of each parameter separately, and is generally used for process analysis, process inspection and measurement of specified parameters.
6) According to the state of the measured part during the measurement process, it can be divided into static measurement and dynamic measurement.
Static measurement: The measurement is relatively static. Like a micrometer to measure diameter.
Dynamic measurement: During the measurement, the measured surface and the measuring head make relative motion in the simulated working state.
The dynamic measurement method can reflect the situation of the parts close to the use state, which is the development direction of the measurement technology.
The above are the accuracy, concept, adjustment method and influence reasons of CNC machining parts. I hope it will be helpful to you.
Ready To Start Your Next Project?
Get Instant Quote

Request a Free Quote
Send us a message if you have any questions or request a quote. We will get back to you ASAP!